Chuggers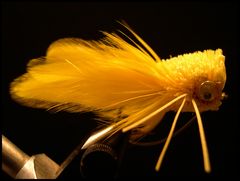 FenceRider Chugger - YellowThe FenceRider Chugger is a scaled down version of the "Most Whit Hair Bug." It's called the FenceRider because it "rides the fence" taking both bass and bluegills. Materials List
Tying NotesEast Texan fly fishing author Jack Ellis coined the term "fence rider" to describe a deer hair bug that was small enough to take slab sized bluegills but large enough to attract largemouth bass. His books, "The Sunfishes: A Fly Fishing Journey of Discovery" and "Bassin' with a Fly Rod" should be in every serious warmwater angler's library. Jack Tied his Fence Rider Bugs on size 6 - Mustad 3366 bass bug hooks. But, I have found that using the slightly larger size 4 hook gives me more latitude in applying materials like a hackle skirt and rubber legs without diminishing the bug's ability to take both bass and bluegills. I tie the FenceRider Chugger in a variety of colors and color combinations. I also tie FenceRider Divers and Sliders using the same hook and the same tying techniques. Angling TipsI prefer fishing the FenceRider Chugger at the end of a 7 1/2 foot leader tapered to 3X on a 6wt. rod. Because I want to impart as much action as possible to my chuggers to make them look as live-like as possible I always attach them to the leader with a Duncan Loop or a Non-Slip Mono Loop. If you're not familiar with these knots check them out at the "On The Water" page. When I developed the original FenceRider Chugger, one of the important considerations was to be able to cast it well on a 5 or 6 wt. rod. It casts well on both but my preference is the 6wt. There are times when slightly more backbone is critical and there is no doubt that a 6wt. handles wind better. The 6wt. also has an advantage over the 5wt. when you connect with four pound bass. The weedguard allows you to fish the fly in and around structure. Cast it wtih confidence into the weeds and fish it there. That's were the big fish are. Tying Instructions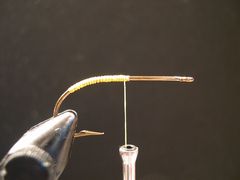 Step 1 Clamp the hook in the vice and crimp the barb. Attach the 6/0 thread slightly forward of the hook point. Lay down a base of thread about one-third of the way down the hook's bend. Reverse the thread and lay down a thread base to exactly 3/16" forward of the hook point. Measure if you aren't sure. I do! 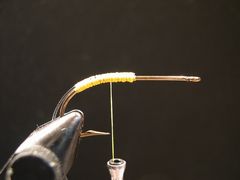 Step 2 Cut a thre-inch piece of piece of 12# Mason Hard Nylon weedguard material and align the front of the mono with the front of the existing thread wraps. Bind the mono to the shank covering it and the entire thread base with tight wraps as shown in the photo. Return the thread to the hook point and coat the thread wraps with thinned Flexament. 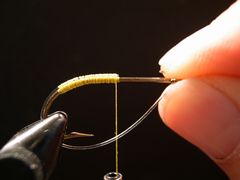 Step 3 Size the weedguard now so you don't have to size it later when deer hair may get in the way. Insert the tag end through the hook's eye, adjust it to the appropriate size, and kink it as shown in the photo.. Flatten the kink with needle nose pliers. 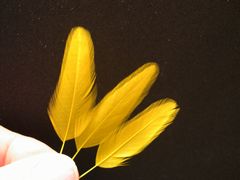 Step 4 Prepare two sets of hen neck feathers each containing two or three feathers. One sset should be taken from the left-half of the cape and the other set from the right-half. 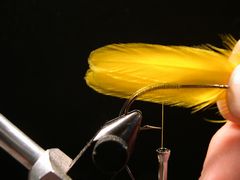 Step 5 Measure the set for the far side of the hook. The feather set should be one and one-half the length of the hook. 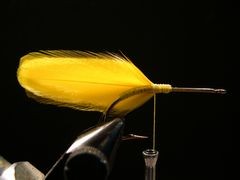 Step 6 Attach the first set of feathers to the far side of the hook with four or five wide spirialing wraps from the hook point to the front of the weed guard. Return the thread with wide wraps back to the hook point in preparation for tying in the second set of feathers on the near side of the hook. 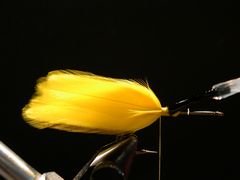 Step 7 Attach the second set of feathers to the near side of the hook in the same manner that you attached the first set. Next, bind the feathers tightly with close tight wraps from the hook point to the front of the weedguard. Return the thread to the base of the feathers in preparation for tying in the skirt. Coat the thread wraps with thinned Dave's Flexament as shown.  Step 8 Select and appropriate hen neck feather for the skirt and prepare it as shown. When the skirt is wrapped the barbs should extend slightly beyond the hook's bend. 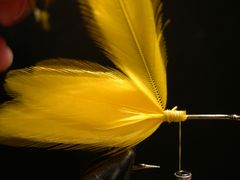 Step 9 Tie the feather in by the tip with the curved side facing the hook and bind it down with tight wraps to the front of the weedguard. Let the thread hang where it is. 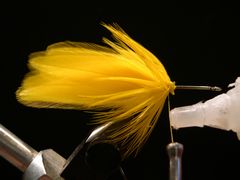 Step 10 Wrap the feather forward. You may have to add an additional feather to cover the existing thread wraps between the hook point and the front of the weedguard. Once you reach the front of the weedguard tie down the feather with a couple of tight wraps and remove any excess material. To finish the skirt, tie it off wiith a Zap-A-Gap knot. Simply coat about an inch of thread nearest the hook with the glue and make 4 or 5 wraps on top of the existing wraps. Remove the thread after the glue dries, which only takes a few seconds. 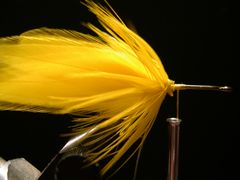 Step 11 Attach the flat waxed nylon thread with a jam knot as shown in the photo in preparation for spinning the first bunch of deer hair. 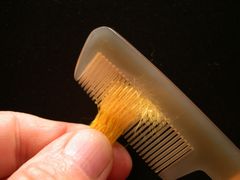 Step 12 Clip a bunch of deer hair from the hide that, when compresed, is the approximates the thickness of a lead pencil. Clean out the underfur with a comb and trim the butts and tips so that you end up with a bundle an inch or so long. 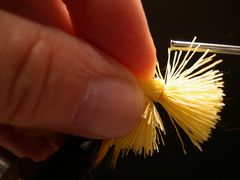 Step 13 Spin the first clump of hair around the hook's shank. Then take two or three tight wraps of thread plus a half-hitch at the base of the hair. 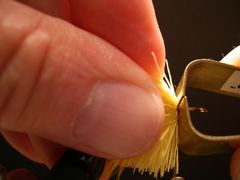 Step 14 Next, pack the hair tightly as shown with a hair packing tool. I prefer the Brassie Hair Packer shown in the photo. 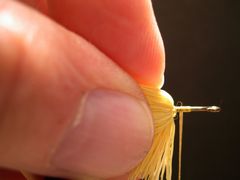 Step 15 In preparation to spin the next bundle of hair take four or five wraps of thread forward and then reverse the thread a couple of turns so that the working thread is hanging on the thread base as shown. Then proceed to repeat steps 12, 13, and 14 as you add aditional bundles of deer hair. 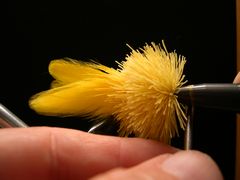 Step 16 Once you are satisfied that the shank is fully packed with deer hair tie off the thread with two half-hitches or a whip finish.  Step 17 Remove the bug from the vice. Hold the bug with its belly up and the tail and skirt protected by your fingers. Begin to trim a path with your curved scissors down the center of the fly from the front to the back. Continue removing hair until you are satisfied that the belly is fairly flat and there is ample clearence between the hair and the hook point.  Step 18 Put the bug back in the vice. Prepare a hair guard by poking a hole with your scissors tip in the center of a one-inch square piece of plastic bag and insert the hooks eye through the hole in the plastic. Attach the 6/0 thread and wrap it back against the plastic until the hook's eye and the hook shank are clearly visible. 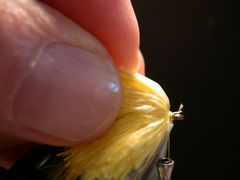 Step 19 Insert the tag end of the weedguard through the hook's eye and adjust it so that the bottom of the guard is about half a gape width below the hook point. The kink that you put in the guard material in Step 3 should help in adjusting the guard. Take three or four tight turns of thread to lock the guard material in place. Trim off any excess mono by trimming it flush with the front of the hook's eye so that you leave a tip as shown in the photo. 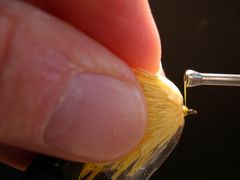 Step 20 Catch the mono tip with your thread and bind it down locking the weedguard in place as you build a neat thread head. 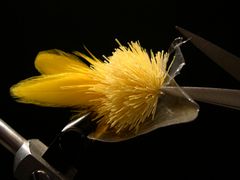 Step 21 Tie off the thread with two half-hitches or a whip finish and remove the plastic by slitting it with you scissors tip. 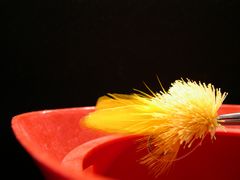 Step 22 Remove the fly from the vice. Clamp a pair of forceps onto the hook's eye and hold it over a "Hot Pot" of steaming water. The "Hot Pot" is what college students keep in their dorm rooms to heat up water for soup, coffee, or cocoa. Put about an inch of water in the bottom of the pot before you plug it in. Steam the bug until the hair is standing at a right angle to the hook shank. You can see the bug grow before your eyes as the steam stiffens the hair. Don't skip this step. It makes trimming the deer hair so much easier. 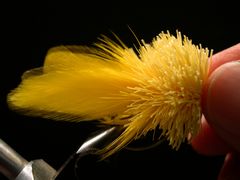 Step 23 Remove the fly from the steam. Before the hair dries flatten the face with you fingertips. You can either return it to the vice to flatten the face or hold it in you left hand. The bug will be dry enough for the next step in a minute of so. 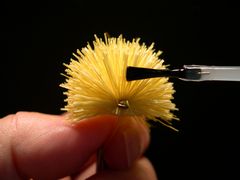 Step 24 After the hair has dried coat the bugs face with thinned Dave's Flexament. It takes about thirty minutes for the glue to dry, but you can speed the drying time to a couple of minutes if you blow-dry the bug with a hair dryer. 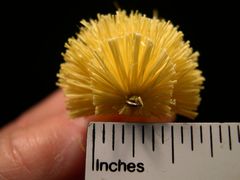 Step 25 After the Flexament has dried, trim the bugs face with your curved scissors so that it's slightly less than one-half inch square and rounded at the top. Measure the face with a ruler to be sure your measurements are correct. I do! 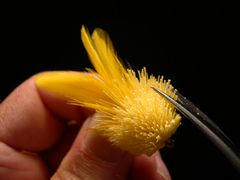 Step 26 Use the face as a guide for your curved scissors. Take small snips of hair to rough trim the bug's body. The final trim will be done with a razor blade later. 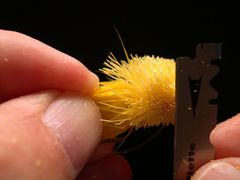 Step 27 Once you are satisfied with the rough trim you can begin the final trim. Hold the bug in an upright position with the tail materials protected by your thumb and fingers and trim the right and left sides from the front to the back. Slightly taper the bugs body as you go. Then turn the bug upside down and smooth the sharp edges on the bugs belly. Don't ever try to use a single edge blade to trim deer hair. It won't work. Always use a double edge blade. To make two blades out of one use a pair of household scissors to cut the blade lengthways. 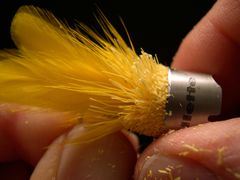 Step 28 Use the double edge razor blade as a "bow saw" to round the top of the bug's body and slightly taper it from the face back to the skirt. 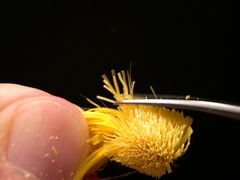 Step 29 During the trimming and shaping process alternate between the razor blade and your curved scissors to give the best trim possible. The scissors is especially handy in those place where a slip with the blade might remove more material than necessary. 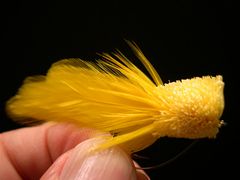 Step 30 This is sthe way your FenceRider Chugger should look after the final trim. It's ready to be fished as is. But most anglers like legs and eyes on the hair bugs. And, you can add eyes and legs to your bug if you wish. 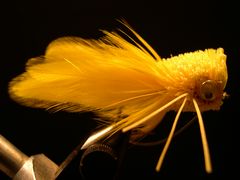 Step 31 If you would like to install eyes and legs on your FenceRider Chugger go to the "At The Bench" page to find out how.
Warmwater Fly Tyer - by Ward Bean
© Copyright 2026 Ward Bean, Council Bluffs, IA, All rights reserved. © Copyright 2026 Ward Bean, Council Bluffs, IA, All rights reserved.
|