Divers and Sliders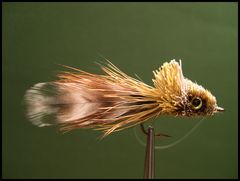 Jack's Fence Rider DiverThe Fence Rider Diver is Jack Ellis's answer to a Dahlberg style diver that's large enough to attract Largemouth Bass but small enough to take big Bluegills. Here is how I tie it. Materials List
Tying NotesThis is a slightly modified version of Jack Ellis's Fence Rider Diver that he describes in "The Sunfishes - A Fly Fishing Journey of Discovery." The modifications are minor but useful in making the fly easier to tie. For instance, Jack uses 6/0 thread to tie in the tail materials, then switches to Monocord for the deer hair work. I use 6/0 Uni-Thread for both operations. It's slightly thinner than other 6/0 threads and much stronger. If you're not too rough - handed, you can easily spin deer hair on this and other small hooks. But, don't try it on larger hooks. It won't work. I also use a slightly larger diameter mono for the weedguard - 10# Mason Hard Mono. Jack recommends 8# mono, but I think the slightly larger size works better. I also employ a unique way of tying off the weedguard at the hook's eye. I also attach the deer hair skirt in a different way than Jack recommends. He suggests stacking a bundle of deer hair tips directly on top of the tail windings. I divide the bundle and tie in half of the deer hair tips on the far side of the windings and the other half on the near side. This is the easiest way to get the skirt hair to encircle the hook's shank. This is a relatively small deer hair bug. I would recommend using deer body hair rather than deer belly or elk hair. Deer body hair will pack much tighter in the small space allowed for the collar and head because it's not as coarse. Angling Tips Tying Instructions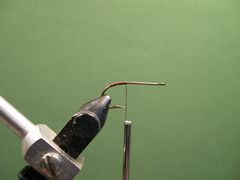 Step 1 Clamp the hook in the vice, crimp the barb, and start the thread just behind the hook's point. Lay down a base of thread back to slightly beyond the hook's bend, then back to the hook's point. 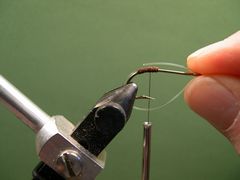 Step 2 Cut a three-inch piece of 10# Mason Hard Mono from your mono spool. Align the weedguard material with the front of the thread wraps and bind it down with close tight wraps covering both the weedguard and the existing thread wraps. Make sure that the weedguard stays on top of the hook's shank during this process. 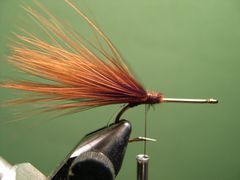 Step 3 Select a brown Marabou plume for the tail and measure it against the hook. The tail should be twice the length of the hook. Tie in the Marabou plume with the butts flush with the front of the thread wraps. Bind down the Marabou tail with close tight wraps as shown in the photo. 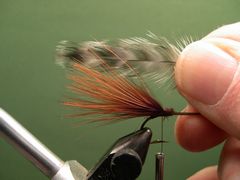 Step 4 Select two matching feathers for the legs and size them. The legs should extend slightly beyond the tail. Once the legs are sized, cut off the excess feather in preparation to tie them in on the far side and near side of the tail. 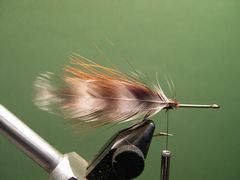 Step 5 Tie in one feather on the far side of the tail and the other on the near side. Take minimal wraps of thread as you attach them to the hook. You will make the final thread wraps in a later step. 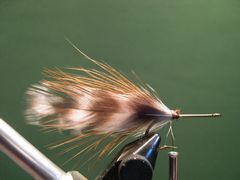 Step 6 Now, coat the thread wraps with some Dave's Flexament and bind the feathers to the hook with close thread wraps. 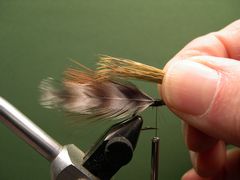 Step 7 Clip a bunch of olive deer hair off the hide for the skirt. The bunch should be about the thickness of a milk shake straw. Even the tips in a hair stacker and measure the bundle against the tail. After the tips are tied in they should extend to half the length of the Marabou tail. Trim the butts of the deer hair bundle. 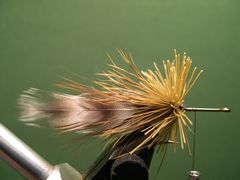 Step 8 Divide the deer hair tips into two bundles of equal size. Attach one bundle to the existing thread wraps on the far side of the hook with two or three tight turns of thread. Then, attach the other bundle on the near side.  Step 9 To begin building the collar and head, clip a bunch of olive deer hair from the hide that's about the thickness of a milk shake straw. Comb out the underfur and trim the butts and tips so that you end up with a bundle about one-inch in length. Spin the hair bundle on the hook's shank. Pull the thread through the hair and take two tight turns of thread plus a half-hitch against the base of the hair. Pack the hair tightly with your hair packer. I prefer a Brassie Hair Packer. It's the best there is. 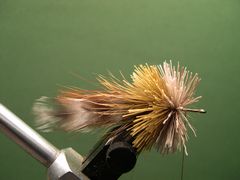 Step 10 Now, repeat the same process with a clump of natural deer body hair. 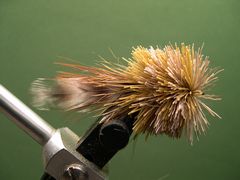 Step 11 Keep adding alternating bundles of the two colors of hair until the hook's shank is completely packed with hair. Tie off the thread with a couple half-hitches or a whip finish. 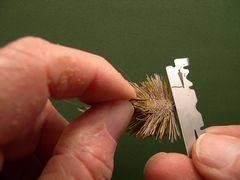 Step 12 Remove the fly from the vice and trim the belly flat. Start with a curved scissors and finish the job with half of a double edged razor blade. Don't use a single edged blade. It won't work. Be sure to protect the skirt with the thumb and fingers of your left hand while you're trimming the belly with your right hand. 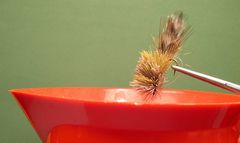 Step 13 Steam the fly over a pan of boiling water, or in this case a Hot Pot, the kind of pot that college students use in their dorm rooms to heat up coffee, soup, etc. The steam causes the deer hairs to stand at a right angle to the hook's shank, making the deer hair bug much easier to trim. Put the fly back in the vice and tie off the weedguard. It's a good idea to check out Steps 17, 18, and 19 of the Yellow Red Head to see how this procedure should be done. 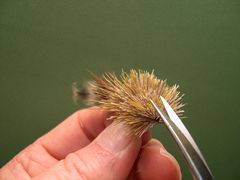 Step 14 Remove the fly from the vice and rough out the head and collar with a pair of curved scissors. 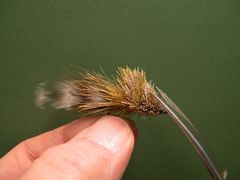 Step 15 Be sure to leave enough deer hair for the diving collar as you shape the head. 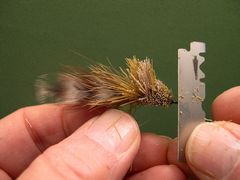 Step 16 Use half of a double edged razor blade to smooth all of the edges and rough spots. 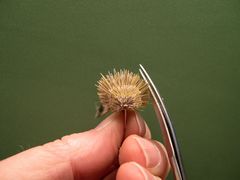 Step 17 Finish trimming the diving collar to shape with your curved scissors. 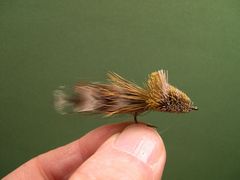 Step 18 This is a side view of the Fence Rider Diver after it has been properly trimmed. 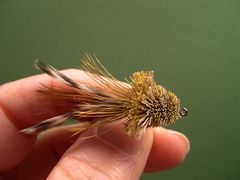 Step 19 This is a view of the Fence Rider Diver from the top. 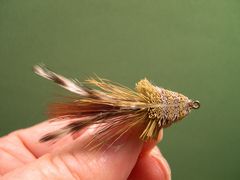 Step 20 And, this is a view of the little guy from the bottom. 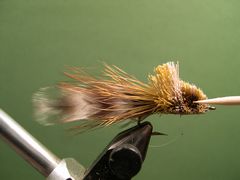 Step 21 Once you're satisfied with the trim, burn sockets for the eyes with a Burning Point. Put the fly back in the vice and pick out the burned hair with a toothpick. If you want to learn how to properly burn eye sockets and glue in the eyes, check out Steps 29 through 32 for the Yellow Red Head. 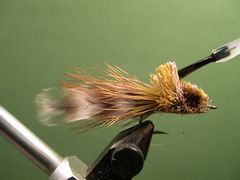 Step 22 After you have put a drop of Dave's Flexament in each eye socket, in preparation for installing the eyes, lightly coat the diving collar with some Flexament. 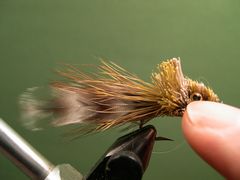 Step 23 Place a dab of Household Goop in each eye socket, with a toothpick, and pop in the eyes. 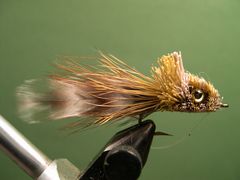 Step 24 Your Fence Rider Diver is finished!
Warmwater Fly Tyer - by Ward Bean
© Copyright 2026 Ward Bean, Council Bluffs, IA, All rights reserved. © Copyright 2026 Ward Bean, Council Bluffs, IA, All rights reserved.
|