On The Water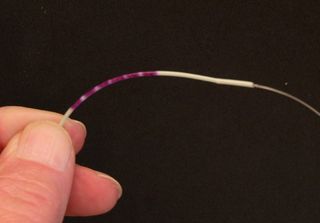 The Knotless Fly Line - Leader ConnectionThere are a number of ways to attach a new tapered leader to your fly line. In my opinion this is the best way to do it. The traditional way to attach a new tapered leader to the fly line was to use a Nail-Knot. The Nail-Knot was actually tied by using a nail in the knot making process. It's difficult to do that way. Over the years a number of tools have been offered by fly shops and mail order houses that make constructing the Nail-Knot easier. However, I believe that the Knotless Line to leader connection is a much better way to attach your leader to your fly line. With the advent of super glues like Zap-A-Gap a new leader-line connection that didn't require a knot was developed. I have been using it for several years on all of my fly lines and I wouldn't attach a leader to a fly line any other way. I first learned about the knot when I purchased Dave Whitlock's book "The L.L. Bean Fly Fishing for Bass Handbook" first published in 1988. There now is a new updated edition. If you're not familiar with Dave's book, you should be. It belongs in every warmwater angler's library. Dave is one of the best fly fishing artists in the country and this book has beautiful illustrations and complete instructions for tying this knot as well as other knots that a warmwater fly fisherman needs to use. To purchase the Fly Fishing for Bass Handbook from Dave, go to his website davewhitlock.com. The Knotless line to leader connection has many advantages over the traditional Nail-Knot. First, the leader is inside the fly line, not attached to the side of the line. Second, there is no knot to hang up in the rod tip. Further, a knot that connects the line to the leader gathers moss. And, it's no fun to have to constantly clean it off your fly line and leader. The Knotless leader connection requires a knotless tapered leader. Knotted leaders and furrled leaders won't work although there is a way to attached knotted leaders and that procedure is described in Dave Whitlock's book as well. Here are the tools and materials that you will need to create a Knotless Line - Leader connection. 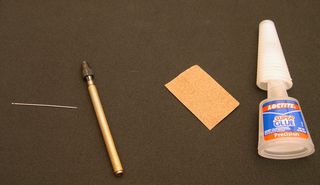
If you can't find a Pin Vice at your local hobby store you can order one from StoneRiverOutfitter.com. They have a beautiful mail-order catalog. You should request a copy. I purchase fly tying materials from them frequently and they are one of the best mail-order houses I know. Creating the Knotless Line to Leader Connection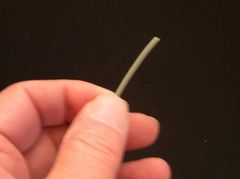 Step 1 Make sure that the tip of your fly line that will be attached to your leader is trimmed evenly.  Step 2 Lock the needle point in the pin vice so that the part with the eye is protruding about three-quarters of an inch. Gripping the tip of the fly line between your thumb and index finger begin to insert the needel into the fly line. It might help to rotate the vice during this process. Make sure that the needle doesn't exit the fly line until you have inserted about one-half inch of the needle. Bend the line so that the needle's eye exits the line on the side. You might want to use a hard surface like your bench top to press the line and the needle against in order to help the needle exit the line. 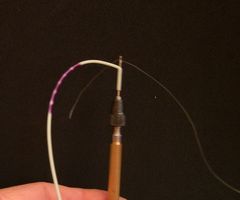 Step 3 Thread the tippet end of the leader through the needle's eye until about an inch or so of the tippet is protruding through the needle's eye.  Step 4 Then pull on the pin vice until the tippet end is pulled out the front of the fly line and protrudes about an inch or so from the fly line tip. 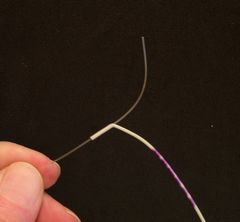 Step 5 Grasp the leader tippet and pull the leader through the fly line until only about two-inches of the leader butt remains above the hole made in the fly line. You will use the leader butt in a later step as you finish attaching the leader to the line. 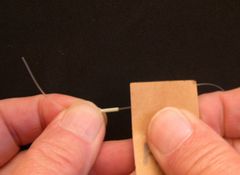 Step 6 Lightly sand and rough up about one-half inch of the leader just in front of the fly line tip. This is the area where you will apply the super glue and the roughed up area helps the glue stick to the leader making for a secure bond with the fly line. 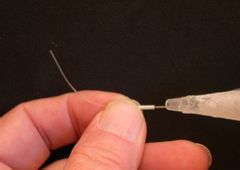 Step 7 Cover the roughed up area of the leader with super glue. This step and the next step must be done quickly before the glue dries. Make sure that you don't get any glue on your fingers or the fly line.  Step 8 Quickly grasp the tip of the fly line with the thumb and index finger of your right hand and and pull the tag end of the leader with your left hand until the roughed part of the leader with the glue on it is inside the tip of the fly line. You can see in this photo that the leader butt is now longer by one-half inch because it has been pulled through the line. 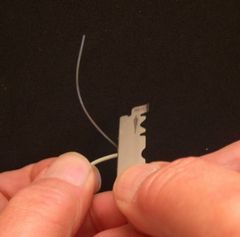 Step 9 Allow a few moments for the glue to set and then trim the butt with a double-edge razor blade. The blade in the photo is one-half of a double-edge blade. Make sure you don't cut the fly line as you're removing the excess leader butt with the blade. 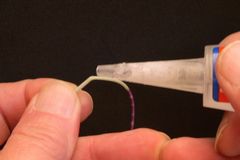 Step10 Lastly, add a small drop of super glue to the exit hole on the line where the needle exited in an earlier step. Then, stretch the line and leader and rub and compress the spot that received the last drop of glue until the line-leader connection is straight. 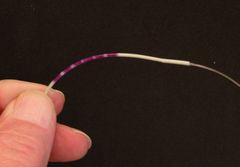 Step 11 Grasp the leader with one hand and the fly line with the other and pull as hard as you can to test the connection. This is how the rig should look when all is done. If this entire procedure is done properly you can be assured that the leader will break before the connection does. I have never had a line and leader fastened this way come apart. If you are curious, the marks on the fly line indicate the line size. I make those marks on the line with a waterproof marker and then I always know what weight is on a given fly reel.
Warmwater Fly Tyer - by Ward Bean
© Copyright 2026 Ward Bean, Council Bluffs, IA, All rights reserved. © Copyright 2026 Ward Bean, Council Bluffs, IA, All rights reserved.
|