Divers and Sliders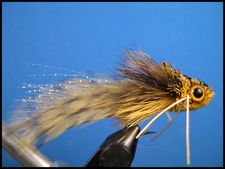 FenceRider Frog - Yellow BellyLike the FenceRider Frog with the orange belly this frog is also deadly on Bass and large bluegills. Materials List
Tying NotesThe overall length of the FenceRider Frog should be two inches or a tad longer. I specify materials in the materials list that I like. Don't hesitate to substitute. For instance, I prefer Flat Waxed Nylon for deer hair work. If you prefer some other thread, use it. The same goes for the rubber legs and the eyes. Angling TipsFish the FenceRider Frogs on either a floating line or a sink-tip line that has been cut back to five feet. Which ever line you use, don't hesitate to cast on to vegitation or even up on the bank before you begin to fish it. The weedguard should give you confidence. Remember, these little guys are supposed to represent a frog and frogs live and play close to shore. I often get strikes shortly after the fly moves from the shore or the vegitation into the water. Tying Instructions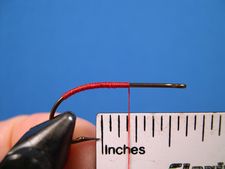 Step 1 Clamp the hook in the vice and crimp the barb. Attach the thread slightly forward of the hook point and wrap the thread one-third of the way down the bend. Reverse the thread and lay down a base of thread to exactly 3/16th inch forward of the hook point. Measure if you aren't sure, I do. 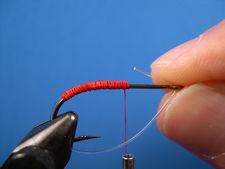 Step 2 Cut a three-inch peice of Mason Hard Mono for the weedguard and align the front of the mono with the front of the existing thread wraps. Bind the mono to the shank covering it and the entire thread base with tight wraps as shown in the photo. Size the weedguard now so you don't have to do it later with deer hair in the way. Insert the tag end through the eye, adjust it to the appropriate size, and kink it. Flatten the kink with needle nose pliers and remove the excess material. 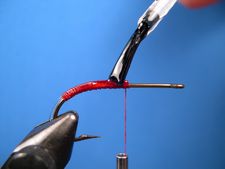 Step 3 Cloat the thread wraps with Dave's Flexament that has been thinned almost to the consistency of water. 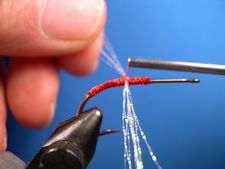 Step 4 Take four strands of crystal flash, fold them and cut them into eight strands of equal length. Center the eight strands over the hook shank at the hook point and bind them down with three or four figure-eight wraps. In the photo you are seeing a view from the top of the hook. 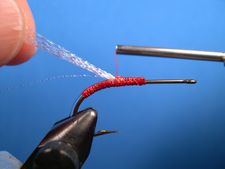 Step 5 Grasp all of the crystal strands and pull them behind the hook. Take three or four wraps of thread to bind them down with the thread ending up several turns behind the hook point. Return the thread to the hook point and trim the Crystal Flash strands so that they are about two inches long. 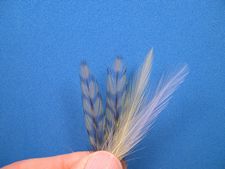 Step 6 Prepare two sets of feathers for the tail consisting of one white, one yellow, and two olve grizzly rooster neck feathers. Even the feathers and cut the stems so that the sets are about two inches long. 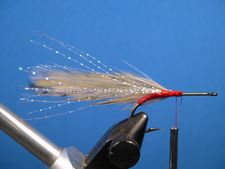 Step 7 Attach one set of feathers to the far side of the hook with four or five wide spirialing wraps of thread from the hook point to the front of the weed guard. Return the thread with wide wraps back to the hook point. 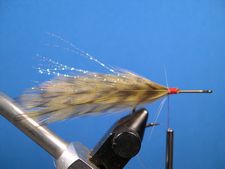 Step 8 Attach the second set of feathers to the near side of the hook with four or five spiraling thread wraps to the front of the weed guard. Return the thread with wide spirialing wraps back to the hook point. Make sure that the tail feathers are aligned properly. Adjust if necessary. 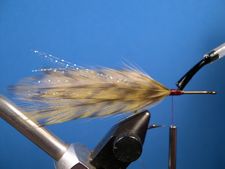 Step 9 Coat the thread wraps with Dave's Flexament, thinned almost to the consistency of water, and make close tight wraps from the base of the feathers to the front of the weed guard.  Step 10 Tie off the thread with a Zap-A-Gap Knot. Simply coat about an inch of thread nearest the hook with the glue and make 4 or 5 wraps on top of the existing thread wraps. Remove the thread after the glue dries, which takes only a few seconds. 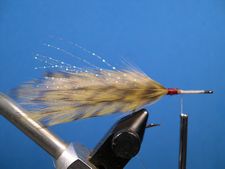 Step 11 Attach the Flat Waxed Nylon tying thread at the hook eye and lay down a thread base back to the front of the weed guard. Then take three or four wraps of thread forward and let the thread hang ready for the first bunch of deer hair. 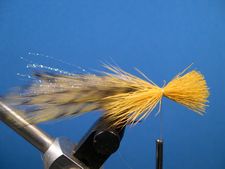 Step 12 To make the skirt clip a clump of yellow deer hair from the hide that, when compressed, is about the thickness of a lead pencil. Comb out the underfur and put the hair, tips first, in a hair stacker. Even the hair and remove the bundle of hair from the stacker. Trim the butts. Tie the clump in so that the hair is on the bottom of the hook shank and the hair tips extend slightly beyond the hook bend. Leave the thread hanging while you prepare for the next step. 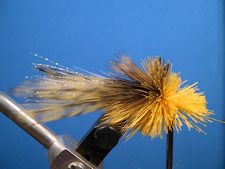 Step 13 Next, prepare a "soda straw" bunch of olive deer hair the same way you did the yellow hair and tie it in on top of the hook shank. Let the thread hang for the next bunch of hair. 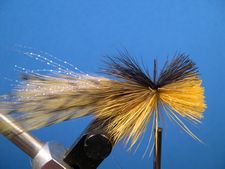 Step 14 Now prepare a "match stick" size bunch of black deer hair, prepare it the same way that you did the previous bunches of hair, and tie it in with a couple tight wraps of thread. Let the thread hang for the next step. 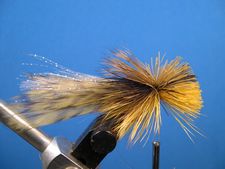 Step 15 Finally, prepare a "match stick" size bunch of olive deer hair the same way you did the other bunches of hair and tie it in with a couple wraps of thread. 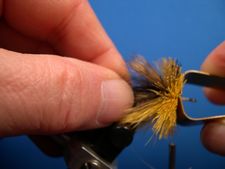 Page 16 With your left hand use the "three-finger" pull back to pull the hair back, then pull the thread to the front of the hair and make three or four wraps and a half-hitch against the base of the hair. Then pack the hair as shown with a hair packing tool. I prefer the Brassie Hair Packer. Next, move the thread forward three or four turns in preparation for the next bunch of hair. Step 17 To build the body, clip a "pencil" size bundle of yellow hair from the hide, except this time comb out the underfur and trim both the butts and the tips. Tie the bundle in on the bottom of the shank with a couple of wraps of thread just like you did with the yellow hair when you built the collar. Let the thread hang while you prepare the next bunch of deer hair.  Step 18 Clip a "pencil" size bunch of olive deer hair, comb out the underfur, and trim both the butts and the tips. Tie it in on top of the hook shank with two turns of thread and let the thread hang for the next bunch of hair.  Step 19 Now, prepare a "match stick" size bunch of black deer hair the same way that you did the olivie hair and tie it in with two tight turns of thread.  Step 20 Once you finish step 19, use the three finger pull-back, take three or four turns of thread plus a half-hitch at the base of the hair and pack the hair with the hair packer. Move the thread forward four or five turns. There still should be enough room left on the hook for you to repeat the stacking process one more time. Yellow on the bottom, olive on top, followed by black.  Step 21 Once the hook shank is filled with hair use your half-hitch tool as shown in the photo to make two half-hitches. Then remove the thread.  Step 22 Remove the frog from the vice. Now is the time to begin the body trim. Hold the frog belly up with the tail and skirt protected by your fingers. Begin to trim a path with your curved scissors down the center of the fly from the front to the back. Continue removing the hair until the trimmed belly suits you. Look at the photo in step 24 to see how the belly should look. 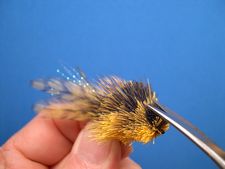 Step 23 Turn the frog over, hold it by the hook, and use your curved scissors to rough trim the top of the body as shown in the photo. Trim from the front to the back of the body. Make sure to leave some hair at the rear for a short collar. Trim the left side then the right side of the body from the front to the back roughly forming an arrowhead shape. Then trim the top so the body will slope upward from the front to the back.  Step 24 This is the way your frog should look after it has been rough trimmed. Except for the belly the frog will get its final trim after the weedguard is attached to the hook eye in the next step. So, be sure that you are satisfied with the belly. There must be ample room between the belly and the hook point. Use a razor blade to give the belly one last trim, if you think that it needs it. 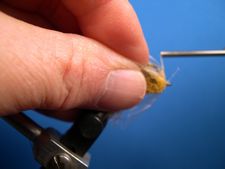 Step 25 Put the frog back in the vicie. Poke a whole with your scissors tip into the center of a one-inch square piece of plastic bag and push the hook eye through the whole. Attach the 8/0 thread. Wrap the thread back against the plastic until the thread is as tight as it can be without the fear of breaking. This should allow ample space to tie in the tip of the weedguard. Insert the tag end of the weed guard through the hook eye and bind it down with a couple of thread wraps. Adjust the guard so that the kink is in the hook eye. With your scissors, trim the tip of the weedguard material flush with the front of the hook's eye. Catch the tip with the thread and bind it down with several wraps of thread. Form a neat thread head. Tie off with two half-hitches and remove the thread. 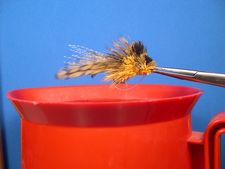 Step 26 Remove the frog from the vice. Clamp a pair of forceps onto the hook eye and hold the frog over a "Hot Pot" of steaming water. The "Hot Pot" is what college students keep in their dorm rooms to heat up water for soup, coffee, or cocoa. Put about an inch of distilled water in the bottom of the pot before you plug it in. Steam the frog until the hair is standing a a right angle to the hook shank. You can see the bug grow before your eyes as the steam stiffens the hair. Don't skip this step. It makes the final trim with the razor blade so much easier.  Step 27 Now it's time for the final trim with half of a double-edged razor blade. The best way to separate the blade is to cut it in half lengthwise with a pair of household scissors. Hold the frog with the tail materials protected by your thumb and fingers and begin by shapiing the sides of the frog and rounding off any sharp edges. Hold it upright for part of the trimming process and turn it over so that its belly is up to trim from all angles. When your're satisfied with the sides of the frog move to the top to continue shaping the body. Trim the hair by using a sawing motion with the blade.  Step 28 Here is a the side view of the frog after the final trim is complete. Notice how short the collar is. Remember, you have two cutting tools to use during the trimming process - the curved scissors and the razor blade. They are not mutually exclusive. Change from one to the other during the trimming process, as needed.  Step 29 Here is a top view of the FenceRider Frog.  Step 30 Here is the front view of the FenceRider Frog. All that's left is to install the eyes and the legs.  Step 31 To install the eyes you can either burn or cut eye sockets. If you cut the sockets, use the tips of your scisssors. I prefer to burn the sockets with a bruning point as show in the photo.  Step 32 If you burn the eye sockets, clean the burned hair out of the sockets with your bodkin or a round toothpick.  Step 33 Turn the frog on its side and liberally coat the eye socket and the area just behind it where the legs will be installed with thinned Dave's Flexament. Turn the frog on its other side and repeat the process. Also, coat the collar with Flexament.  Step 34 Put a dollop of Household Goop in each eye socket. This is best accompolished with a round toothpick. Household Goop can be purchased at any hardware store or home center.  Step 35 Pop and eye into each eye socket.  Step 36 The last step is to sew in the frogs front legs. But, before you do, make sure that the glue you applied in step 33 is completely dry. It takes at least a couple of hours for the glue to completely cure. I generally set my deer hair flies aside and let them cure overnight. 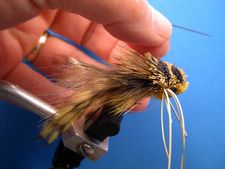 Step 37 After the glue has cured flatten the collar with your fingertip. Then, sew the three rubber legs through the frog, as shown in the photo, with the Whitlock Leg Sewing Tool. Directions for making the leg sewing tool can be found at the Tier's Bench page. 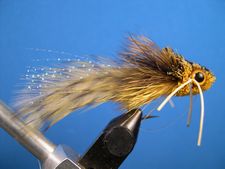 Step 38 Next, trim the legs to a length that suits you. I like them about one-half to three-quarters of an inch long. Congratulations! Your FenceRider Frog is finished.
Warmwater Fly Tyer - by Ward Bean
© Copyright 2026 Ward Bean, Council Bluffs, IA, All rights reserved. © Copyright 2026 Ward Bean, Council Bluffs, IA, All rights reserved.
|