Featured Fly Tiers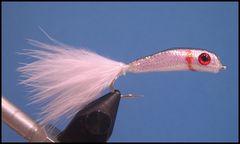
Zook's Foam Minnow
Tied by Lance Zook Iowa angler and fly tyer Lance Zook designed this topwater lure to take smallmouth bass but over the years he has taken several other species of warmwater gamefish with it as well. Materials List
Tying NotesThere is some preparation for this pattern. The foam underbody can be made in a variety of ways. Rainy's float foam comes in a round strip that can be sized to the mylar tubing, but it is expensive for the number of flies that can be made from a single package. There are also pre-formed round foam blanks in various sizes but they are expensive also. I prefer to make my own body cores by using a sharpened brass tube that's about three-inches long and Wapsi's one-half inch thick sheet foam. I cut the foam into strips approximately one and one-half inches wide to make it easier to work with. I select the size of brass tube by taking a piece of the mylar, that I'm going to use, to the hardware store or hobby shop and find the size of brass tube that fits easily into the mylar. Then I sharpen the brass tube with a Dremel tool or a hand file. There is a small diamond coated knife and hook sharpner that looks like a small ink pen that works great for keeping an edge on the tube after it have been sharpened. Once it's sharpened, try to protect the ends of the brass tube as it becomes dull quickly. I finish the Foam Minnow in two different finishes; a shad finish shown in the tying sequence and a perch finish. The perch finish has a green back, orange sides with green bars, and a yellow body. I would suggest using Prismacolor waterproof marking pens for this job. They can be purchased at most hobby or craft stores. Editor's Note: The pre-formed foam cylinders come in several sizes from Feathercraft or Stone River Outfitters. They are available six to a pack. I use the small (1/4") cylinder on a size 6 hook and the larger (5/16") cylinder on the larger size 4 hook and use extra-large pearl mylar tubing on both. The 5/16" cylinder is a bit too large for the mylar tubing so I make it fit by sanding it to size with my Dremel Tool.  Angling TipsThere are several different ways to fish the floating minnow. Sometimes I fish it on top as a wounded minnow, but the most effective way I have found is to use a sink tip or full sinking line. I allow the line to sink, pulling the fly down with it. When I strip in line, the fly dives down and then slowly floats back up to the surface. This is great over weedbeds or very rocky areas and is dynamite on crappies in the spring. Editor's Note: I have had good success fishing Zook's Floating Minnow on a weight-forward line with a five-foot sink tip. Tying Instructions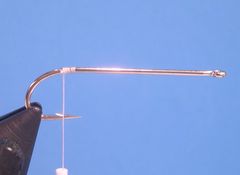 Step 1 Clamp the hook in the vice and crimp the barb. Start the thread at the rear of the hook's shank and lay down wraps of thread to above the hook's barb. 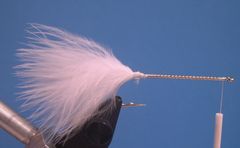 Step 2 Tie in the marabou tail. The tail should be the length of the hook. 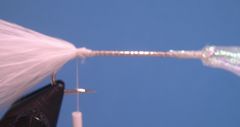 Step 3 Wrap the thread forward to the hook's eye with close tight wraps of thread. You want a good thread base on the hook's shank to absorb the super glue when you glue the foam cylinder to the hook. Next, cut a piece of mylar tubing that is about one and one-half times the length of the hook. Gently pull on both ends of the mylar to shrink the diameter of the tubing for tying in. Slide the mylar tubing over the hook's eye until it touches the thread. Most of the tubing will be in front of the hook's eye. This is what you want. Pinch the sides of the mylar tubing against the hook's shank and secure it with three or four tight wraps. Wrap the thread toward the hook's eye covering the mylar tubing with minimal wraps of thread until you are as close to the hook's eye as possible. Note: You may want to keep pulling on the free end of the tubing to keep it from rolling on the shank. 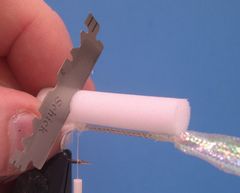 Step 4 Wrap the thread back to the base of the tail. Size the foam cylinder for length against the shank of the hook. The cylinder should just touch the eye of the hook and the base of the tail. Cut the foam to length with half of a double-edged razor blade as shown. 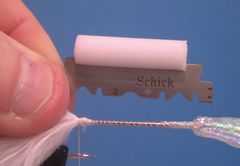 Step 5 Cut a slot length wise with the razor blade that is 1/4 to 1/3 the way through the foam cylinder.  Step 6 Slide the foam cylinder onto the hook's shank with the slot ending up on the bottom of the hook's shank as shown. 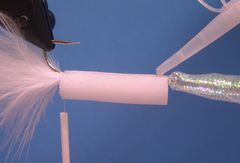 Step 7 Invert the hook so that the slot is facing up and apply small amounts of Krazy Glue or Zap-A-Gap. Let the glue dry for several minutes before proceeding to the next step. I ususlly set the fly aside and tie another up to this point of construction. 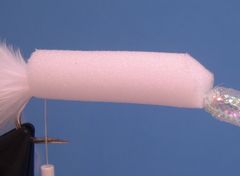 Step 8 Reposition the fly to the upright position and trim the foam with the razor blade so that the the front quarter of the foam cylinder is tapered sharpley toward the eye of the hook. Pull the mylar tubing in the opposite direction of the razor blade to prevent cutting it. It only takes a slight touch from the blade to make the tubing unusable. 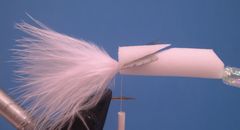 Step 9 Trim the rear half of the foam cylinder at a gradual angle, with the razor blade as shown, to the base of the marabou tail.  Step 10 Now, very slightly taper both the right and the left sides of the rear half of the foam cylinder back to the tail. 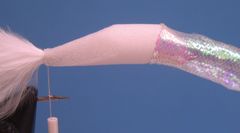 Step 11 Carefully push along the sides of the tubing close to the front of the foam cylinder so that it starts to roll over the front of the foam. 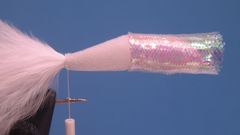 Step 12 Continue rolling the tubing over the body. 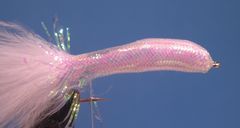 Step 13 The tubing should end up straightened out over the marabou tail. 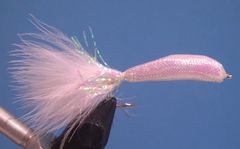 Step 14 Gently pull the loose end of the tubing and secure it at the base of the tail by wetting about an inch of the thread with super glue. Then, take a couple of wraps of thread to tie it off. This process is often referred to as a Zap-A-Gap Knot. Clip the thread and the body is ready to be fitted with eyes in the next step. 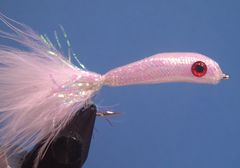 Step 15 Glue on the eyes by putting a drop of super glue on the back of the eyes and stick them on the fly. 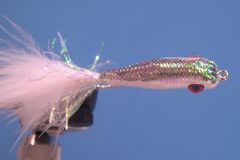 Step 16 Use a gray Prismacolor marker to paint the back as shown. 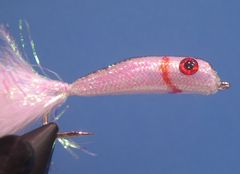 Step 17 Use a red Prismacolor marker to make the gills as shown. 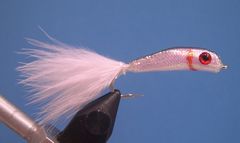 Step 18 I prefer to trim the extra tubing ravels near the base of the tail but you can leave them long if you choose. Your Floating Minnow is finished. Editor's Note: After the Floating Minnow is completely dry ( a couple of hours) I like to paint the entire body with a coat or two of Loon Hard Head Fly Finish. It's a great epoxy substitute.
Warmwater Fly Tyer - by Ward Bean
© Copyright 2026 Ward Bean, Council Bluffs, IA, All rights reserved. © Copyright 2026 Ward Bean, Council Bluffs, IA, All rights reserved.
|