Divers and Sliders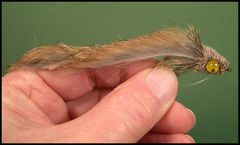 The Grinnel FlyJack Ellis, author of "Sunfishes: A Fly Fishing Journey of Discovery" and "Bassin' with a Fly Rod", says that the Grinnel Fly is his best performing largemouth bass lure. Materials List
Tying NotesJack Ellis first wrote about this fly in the Fall 1990 issue of American Angler where he talked about using the fly to catch bowfin, commonly referred to in the South as Grinnel. Thus, the name of the fly. In his two great books; The Sunfishes: A Fly fishing Journey of Discovery, and Bassin' with a Fly Rod Jack praised the Grinnel Fly as the best largemouth bass lure in his fly box. Jack says that it is supposed to represent a small water snake. He goes on to write that "this fly looks so realistic slithering through the weeds, you'll have to resist the urge to eat it yourself". The Grinnel Fly is easy to tie if you know how to spin, pack, and trim deer hair. If you want to brush up on your deer hair tying techniques before you tie the Grinell Fly, click on: Angling TipsYou can fish the Grinnel Fly on either a floating or sink-tip line. If you want the fly to float in the surface film like a regular snake; use the floating line. If you want to swim the fly under the surface with a strip of the fly line and then pause to have it rise to the surface; use a sink-tip line. The Grinnel Fly will cast on a 6-weight rod with not much difficulty but I prefer to use a 7 or 8-wt rod. The pattern incorporates a weedguard, so don't hesitate to fish it in shoreline vegitation. In fact, it's most effective when fished in the weeds. Tying Instructions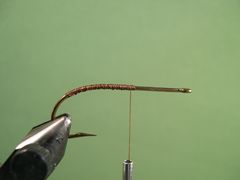 Step 1 Clamp the hook in the vice and crimp the barb, then start the 6/0 thread in the center of the hook's shank and lay down a thread base back to about one-third of the way down the hook's bend.  Step 2 Cut a 3-inch piece of mono for the weedguard and attach it to the top of the hook's shank from the front of the thread wraps back to the rear of the thread wraps.  Step 3 Put the free end of the weedguard material through the hook's eye and size it by crimping the mono as shown. The mono loop should be about one-quarter of an inch below the hook's point. Flatten the crimp with a pair of needle nose pliers and trim the excess material leaving about one-inch of mono forward of the crimped area. 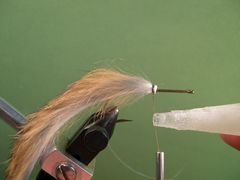 Step 4 Tie in directly on top of the thread wraps a 3-inch piece of Zonker Strip, as shown, and wet about one-half inch of thread with super glue. Wrap the wet thread over the existing thread wraps to make a super glue knot. The glue dries almost instantly. Remove the 6/0 thread in preparation for the deer hair work with the heavier and stronger Flat Waxed Nylon thread. 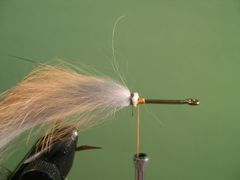 Step 5 Start the Flat Waxed Nylon thread on the bare hook shank at the base of the rabbit strip. 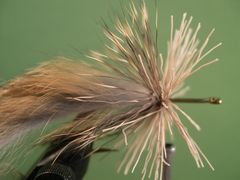 Step 6 Clip a soda straw sized bunch of deer hair from the hide, clean out the underfur with a comb, and even the deer hair tips in a hair stacker. Trim the butts of the deer hair and spin and then spin and flare the bundle of hair on top of the thread wraps to form the collar. 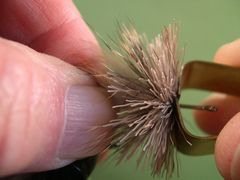 Step 7 Move the thread to the front of the hair and take a couple of turns of thread and a half-hitch at the base of the hair. Pack the hair tightly with a hair packer. A Brassie hair packer is used in this photo. It's the best hair packer on the market.  Step 8 Now, move the thread forward a couple of turns, clip a bunch of deer hair that's about the thickness of a lead pencil and spin and flare it on the hook's shank. Move the tying thread to the base of the deer hair, take a couple of turns of thread and a half-hitch, then pack the hair tightly with the hair packer just as you did with the bunch of deer hair for the collar. Move the thread forward three or four turns and continue to spin and pack bunches of deer hair until the hook's shank is completely filled with hair. 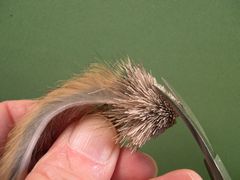 Step 9 Tie off the thread with a couple of half-hitches or a whip finish and remove the fly from the vice. Using curved and serriated scissors rough trim the head to shape. Check the photos in steps 10 and 11 to get some idea of the head's shape. Once you have the head rough trimmed, switch to one-half of a double-edge razor blade to do the final trimming. 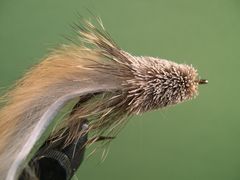 Step 10 Here is a side view of the finished head. 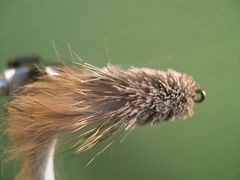 Step 11 Here is a top view of the head after it has been properly trimmed. 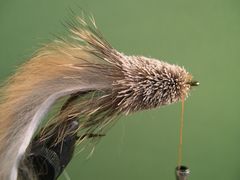 Step 12 Re-attach the tying thread in preparation for tying off the weedguard. 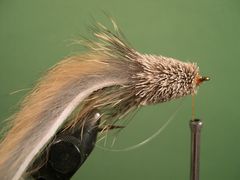 Step 13 Insert the free end of the guard material through the hook's eye and adjust it by usiing the crimp in the mono as a marker. Take a couple of turns of thread over the mono to lock it in place. Trim the tip of the material flush with the front of the hook's eye then catch that tip with the tying thread and bind it to the top of the hook's shank in the process of forming a neat thread head. 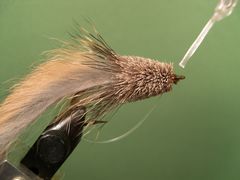 Step 14 Tie off the thread with a couple of half-hitches or a whip finish and coat the thread head with head cement. 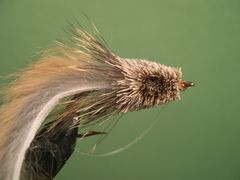 Step 15 Burn the eye sockets with a burning tool or make sockets with the tips of your scissors. In this case I have burned the eye sockets with a tool called a burning point. If you burn the sockets, clean out the bruned hair with a bodkin. 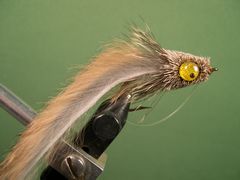 Step 16 To install the eyes you first must soak each socket with a bit of Flexament. Then put a small amount of Household Goop in each socket and pop in the eyes. Your Grinnel Fly is now ready to catch bass.
Warmwater Fly Tyer - by Ward Bean
© Copyright 2026 Ward Bean, Council Bluffs, IA, All rights reserved. © Copyright 2026 Ward Bean, Council Bluffs, IA, All rights reserved.
|