Swimming Flies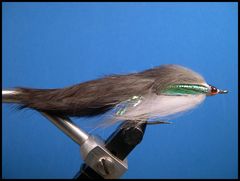 Rabbit Strip ShadThe Rabbit Strip Minnow is big, fishy, and sturdy. Just the ticket for pike and other preditory gamefish. Materials List
Tying NotesThis great looking streamer is fun to build. I tie it on a Mustad 34007 Size 2/0 hook but you can tie it on any stainless steel saltwater hook. When I tie it on a size 2 hook the overall length of the fly is between three and one-half and four inches long. The Rabbit Strip Minnow series includes the following patterns: The Shad, featured in the tutorial, All-White, All-Black, and Charetruese versions, along with Baby Bass, Baby Bluegill, and Blue over White versions.  Tying Strip Minnows is a pretty sraight forward operation. However, their are a couple of testy steps along the way unless you have the right materials. Glueing the rabbit strip tail and back together can be tricky unless you have a bottle of "Tear Mender" Fabric and Leather Repair Adhesive. This stuff is really easy to use. It applies fast, dries quickly, stays flexible, and it's water-proof. To learn more about Tear Mender click on "Glues and Cements." The other way to glue the strips together is with spots of Zap-A-Gap Gel placed sparingly along the length of the rabbit strip. One problem with this method is that the tail is fairly stiff after the glue dries. That's not the case when you use Tear Mender. Another step, applying Epoxy to the Mylar Tube body, isn't tricky but it's time consuming and messy. However, there is an easier and much more efficient way to harden the Mylar body. Simply paint the body with Loon Hard Head fly finish which is a great substitute for Epoxy. To learn more about Loon Hard Head fly finish click on the "Glues and Cements" link above. I prefer to use Uni-Yarn for the underbodies on all of my flies when it's appropriate. Uni-Yarn comes in a variety of colors on spools so it can be applied with a material bobbin. If you don't want to use Uni-Yarn for the underbody, you can substitute Chenille, Furry-Foam, or Floss. If you haven't used Uni-Yarn, buy a spool for a buck and try it. You will like it. Angling TipsBarry Reynolds designed the Rabbit Strip Minnows to be durable baitfish imitations for taking big toothy fish that shred ordinary streamers. Because rabbit soaks up lots of water and the fly is quite large, about four-inches long, you're going to have to use a rod with enough muscle to cast it. An eight-weight rod is my choice. If you're using the fly for Pike and other toothy fish be sure to use the right terminal tackle because their razor sharp teeth easily cut through a typical leader. Remember to attach the fly to your leader with a Duncan Loop Knot which allows the fly to look more life-like in the water. If you're not familiar with the Duncan Loop Knot click on "Warmwater Knots." Barry uses an all-black Strip Minnow for nighttime fishing and his all-white Minnow is effective on most gamefish anytime. He often uses a baby bluegill or baby bass Minnow for Northern Pike. An all-chartreuse Rabbit Strp Minnow can be deadly on Largemouth Bass, and a Blue over White Minnow is preferred by Walleyes. Tying Instructions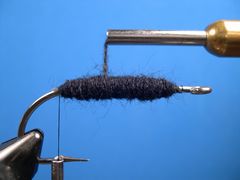 Step 1 Clamp the hook in the vice and crimp the barb. Start the tying thread about 3/16" behind the hook's eye and lay down a base of thread back to the hook's bend.. Attach the Uni-Yarn at the front of the hook with a jam knot just like you did the tying thread and build a tapered underbody on top of the thread base. 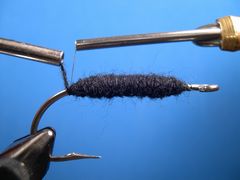 Step 2 Once you are satisfied with the tapered underbody - it should be about 3/16" wide in it's widest part - tie off the Uni-Yarn with a couple turns of tying thread and remove the yarn. 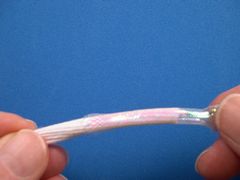 Step 3 Cut a piece of Mylar Tubing about two-inches long and remove the cotton core. 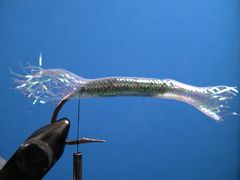 Step 4 Fray about 1/2" of the tubing and slip the frayed end over the Uni-Yarn underbody with the frayed end extending beyond the hook's bend. 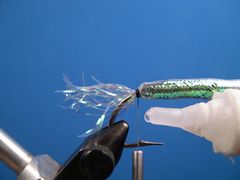 Step 5 Bind the tubing with several turns of the thread. Don't bind the freyed ends of the tubing, bind it down where it's not freyed. Tie off the thread with a Zap-A-Gap Knot. Simply moisten about an inch of the thread nearest the hook with the glue and wrap the wet thread on top of the existing thread wraps. The glue dries in a few seconds and you have a know that will last forever. 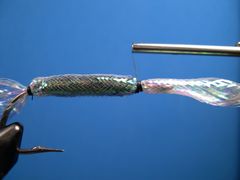 Step 6 Attach the thread at the front of the fly and follow the same procedure to bind down the Mylar tubing as you did to the rear of the fly in step 5.  Step 7 Remove the excess tubing with the points of a small sharp scissors. 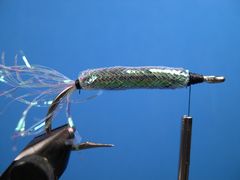 Step 8 Finish by making a thread base as shown and tie off the thread. 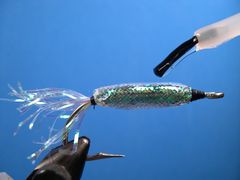 Step 9 Coat the Mylar body with Epoxy or with Loon Hard Head fly finish as I'm doing here. Set the body aside to dry. I make several bodies at one time and let them dry for at least eight hours or overnight. 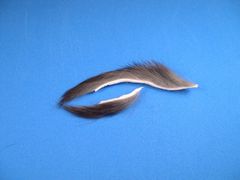 Step 10 Cut two pieces of rabbit (Zonker Strip) for the body. The strip at the top of the photo is for the the back and upper half of the tail. It should be at least four inches long from the hair tip to the front. The strip below is the bottom part of the tail. It should be at least two and one-half inches long. Apply "Tear Mender" to the hide of both strips with the point of a toothpick. I put several drops of the glue on a sheet of paper and dip the toothpick in it. Just a small thin line on the leather of the bottom strip and a small thin line of the glue on an equal length of the top strip. Don't overdue with the glue. A little goes a long way and you don't want to get it on the fur. 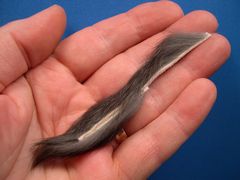 Step 11 Align the bottom part with the top part and press them together and gently lay it aside for the glue to dry. It takes three minutes for the glue to dry. Make sure the natural slant of the fur will be toward the rear of the completed back and tail section. Here is how the assembly should look after the pieces have been glued together. Notice that the hide matches evenly. 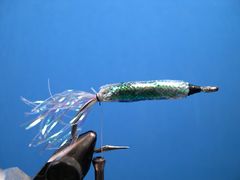 Step 12 Clamp the hook back in the vice. 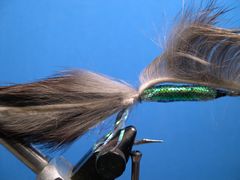 Step 13 Attach the white thread to the rear of the hook, align the tail-back assembly up with the hook so that the hide from the bottom tail piece is snug against the hook, and bind down the assembly with several wraps of thread. If you want the tail to be longer, don't snug the hide of the bottom piece against the hook, but make sure you have enough of the back strip left to eventually bind it down at the front of the hook. It's a good idea to moisten the fur on the tail-back assembly before you bind it down to prevent catching the rabbit fur with the thread. Finally, tie off the thread with a Zap-A-Gap knot. 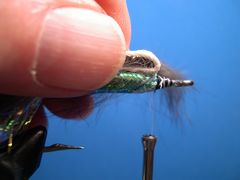 Step 14 Place a slight bead of Zap-A-Gap on the top of the Mylar body and glue the strip to it. Lift up the front of the rabbit strip and attach the white thread as shown.  Step 15 Moisten the fur and seperate it with a bodkin so you don't bind down any fur and take several wraps of thread binding the strip down at the base of the Mylar body. Tie off the thread with a Zap-A-Gap knot and remove the thread. 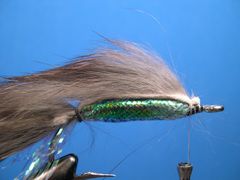 Step 16 Remove the excess rabbit strip with the tips of a sharp scissors. Tie off the thread with a couple of half-hitches and remove the fly from the vice. 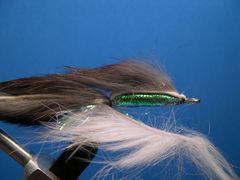 Step 17 Cut a piece of white rabbit strip for the belly that's about two and one-half inches long from the tip of the fur to the front of the strip. With your bodkin, poke a hole in the center of the hide near (about 3/16") the rear end of the rabbit strip. Slip the pierced rabbit strip over the point. Replace the hook in the vice. Slide the strip up the bend of the hook until it's tight against the hook.  Step 18 Place a thin bead of Zap-A-Gap on the underside of the mylar body, pull the rabbit strip tight, and press it against the body to glue it down. After the glue has dried, lift up the hide hanging over the front of the hook and reattach the tying thread.  Step 19 Wet the fur and seperate it with your bodkin at the tie in point so you don't bind down any hair. Take several wraps of thread and tie off the thread with a Zap-A-Gap knot. This step is much easier if you have a rotary vice so you can turn the fly on it's back.  Step 20 Remove any excess rabbit strip with the tips of a sharp pair of scissors. 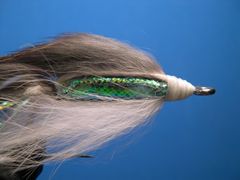 Step 21 Form a neat fairly large thread head and tie of the thread with a Zap-A-Gap knot. 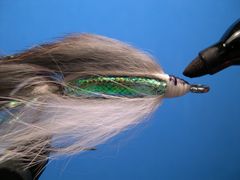 Step 22 Paint the top half of the thread head with a gray waterproof marker. 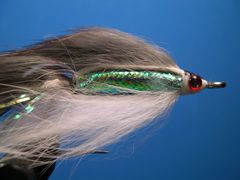 Step 23 Attach the 3-D plastic eyes to the thread head.  Step 24 Coat the head with epoxy or, in this case, a couple coats of Loon Hard Head fly finish. 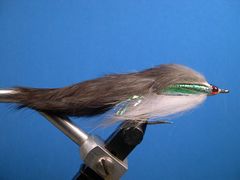 Step 25 Your shad pattern Rabbit Strip Minnow is finished.
Warmwater Fly Tyer - by Ward Bean
© Copyright 2026 Ward Bean, Council Bluffs, IA, All rights reserved. © Copyright 2026 Ward Bean, Council Bluffs, IA, All rights reserved.
|