Swimming Flies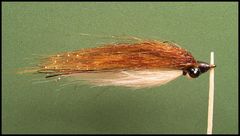 Craft Fur MinnowThere are three fly patterns that are found in virtually every anglers fly box. One is the Woolly Bugger, another is the Dahlberg Diver, and the third is the Clouser Deep Minnow. This minnow is fashioned after the Clouser Minnow with Craft Fur replacing the traditional bucktail. Materials List
Tying NotesOnce again, Craft Fur is appearing in the catalogs of most of the major mail-order fly fishing outfits that sell fly tying materials. Years ago we used a product called Fly Fur for all sorts of fresh and saltwater streamers, but it eventually disappeared. The new Craft Furs on the market, produced by Targus and others, is called by a variety of names. In the case of Targus, which I prefer over other craft fur products, the brand name is FoxxFurr. But, all brands are basically the same. What sets craft fur apart from other synthetic hairs is that each patch has fibers varying in length. Cut off a bunch and you will have super long hairs, medium length hairs, and short hairs, all in the same bunch.  Craft Fur comes in a variety of colors and it takes color from waterproof markers easily. There are even "Grizzly Colors," by Targus, that look just like naural grizzly saddle hackle laying over a "fur bed" of your color choice. You can't even the tips of Craft Fur in a hair stacker like you can bucktail, but all you have to do to even a bunch is to grasp the bunch of hair tightly by the butts and pull out the longer hairs. The Craft Fur Minnow in the tying sequence is tied on a size 6 hook but I have tied them on hooks ranging from size 4 to size 10. If you tie a Craft Fur Minnow that is larger than size 6, use larger bead chain eyes. For small flies use smaller eyes. Always use a thread color, for the head, that matches the color of the Craft Fur Minnow's back. I tie my Craft Fur Minnows in a variety of colors. In fact, using Craft Fur, you can duplicate the color scheme of any Clouser Deep Minnow. And, it's certainly easier to use than bucktail with basically the same results. Angling TipsI fish the Craft Fur Minnow like I would fish any Clouser Deep Minnow. I use Bead Chain eyes in place of the lead barbell eyes typically found on Clouser Minnows. So, if the fish are really deep I would suggest using a sink-tip or full-sinking line. I like to attach the Craft Fur Minnow, and all of my flies for that matter, with a Duncan or other fixed loop knot. If you're not familiar with this type of knot, click on "Warmwater Knots" to learn how to tie them. Tying Instructions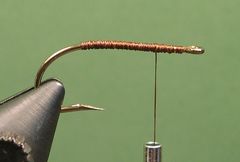 Step 1 Clamp the hook in the vice and crimp the barb. Start the thread at the hook's eye and lay down a thread base from the eye to the bend and return to about one-third of the shank's length behind the hook's eye. 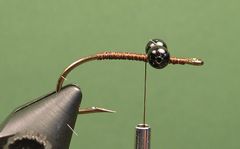 Step 2 Tie in the bead chain eyes with several figure-eight wraps. Make several wraps around the eyes to fill up the space between them. This will allow the white belly material to bulge above the eyes forming a transition to the belly. 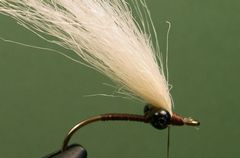 Step 3 Clip a clump of craft fur from the patch and remove the longest fibers by gripping the butts tightly. Then remove the longest fibers with your finger tips. This is a substitute for the process that you would use to even bucktail tips in a hair stacker. To tie in the belly, move the thread in front of the eyes and bind down the butts of the hair clump with tight wraps of thread. 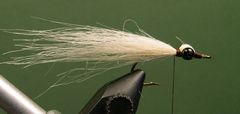 Step 4 Move the thread behind the eyes and bind down the craft fur with three or four tight wraps. 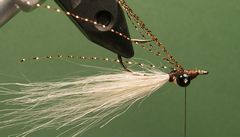 Step 5 To create the back, turn the fly over with the barb pointing up and move the thread to the front of the eyes. Tie in five or six strands of gold Crystal Flash that is at least as long as the belly fur. 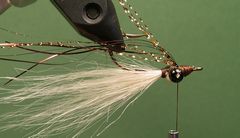 Step 6 Next, tie in five or six strands of copper Flashabou that are the same length as the Crystal Flash. You should be forming a neat thread head during the process of tying in the back materials. 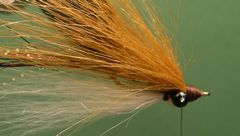 Step 7 Select and prepare a clump of brown craft fur just as you did with the fur for the belly. Tie it in directly on top of the flash material. Form a neat thread head, then tie off the thread with a Zap-A-Gap Knot. To make a Zap-A-Gap Knot, simply coat about an inch of the tying thread nearest the hook and wrap the wet thread over the existing thread wraps. Let the glue dry and clip the thread. 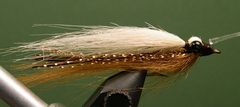 Step 8 Coat the head with head cement. I prefer Sally Hansen's "Hard As Nails" nail polish for this job. 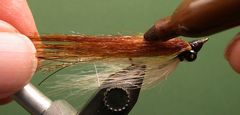 Step 9 When I tied this fly I preferred dark brown craft fur but had only a light brown so I made it darker with a dark brown waterproof marking pen. 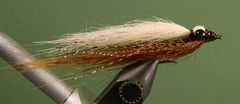 Step 10 At this point your Craft Fur Minnow is ready to be fished. 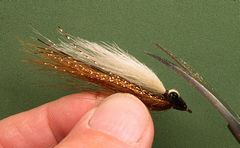 Step 11 If you want to shorten the Craft Fur Minnow ,use a curved serriatated scissors for the job. Some tiers prefer the belly to be shorter than the back and this can be accomplised using the scissors. 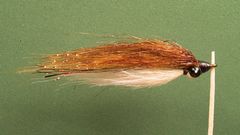 Step 12 This is how the Craft Fur Minnow looks after it has been shortened to about two inches.
Warmwater Fly Tyer - by Ward Bean
© Copyright 2026 Ward Bean, Council Bluffs, IA, All rights reserved. © Copyright 2026 Ward Bean, Council Bluffs, IA, All rights reserved.
|