Swimming Flies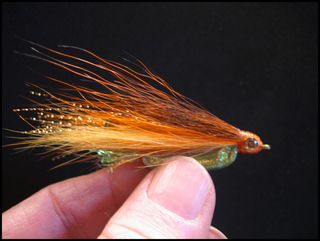 The Rattle RouserKirk's Rattle Rouser is a neat streamer that incorporates sound into the pattern by inserting a worm rattle in the mylar tubing belly. A worm rattle is used by bait casters very successfully in plastic worm rigs. Materials List
Tying NotesKirk Dietrich uses the Mustad 34011 4X saltwater hook for the Rattle Rouser in sizes 6 through 2/0. I used the Mustad 9395 which is a 4X long streamer hook in size 2. Kirk also inserts a BB in the tubing along with the rattle to add balast thereby causing the fly to be keeled properly. This only works on larger patterns - 2 through 2/0. Because there isn't enough room for both the BB and the rattle on smaller patterns he applies a piece of lead wire on top of the shank to get the same effect. Kirk applies Epoxy to the mylar tubing and the head of the fly although Loon Hard Head Fly Finish is much faster and easier. You can even substitute Sally Hansen't Hard As Nails nail polish to accomplish the same task although you will need two or three coats of Hard Head or Nail Polish to do it right. Kirk also uses bucktail hairs for the wing but I have found that Craft Fur works almost as well. However, the Rattle Rouser in the tying sequence is tied with a bucktail wing.  Angling TipsThe Rattle Rouser, in the larger sizes, casts best with an 8wt. rod. Fish it with short strips to get the rattle to work properly. In the Fly Tyer article Kirk indicated that the Rattle Rouser had successfully taken redfish, speckled trout, largemouth bass, king mackerel, striped bass, and brown trout. Tying Instructions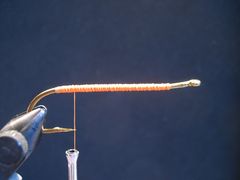 Step 1 Before you clamp the hook in the vice, bend the hook shank back approximately 15 to 20 degrees, about one and one-half eye lengths behind the eye. Clamp the hook in the vice, crimp the barb, and start the thread where you bent the hook. Lay down a thick base of thread back to the hook's barb. 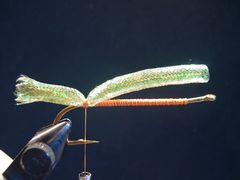 Step 2 Attach a 3-inch piece of tubing at the rear of the hook with three-quarter inch of tubing extending beyond the hook's bend. Take one turn of thread around the tubing only, tighten the thread, tighten the thread, then bind the compresssed tubing to the shank with eight to ten snug wraps of thread. Hold the tubing in place as you secure it; you don't want it to roll off to the far side of the hook. 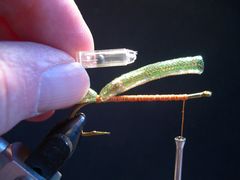 Step 3 Hold the tubing up out of the way with your free hand as you wrap the thread forward to the front of the thread wraps. Insert a BB and the rattle into the tubing. Notice in this photo that the BB is already in the tubing. If you are using a worm type rattle that has a point on the front, cut the point off with a pair of side cutters and smooth out any rough edges with an emory board or a dremmel tool. If you don't do this, the point will cut the tubing when you bind it down. 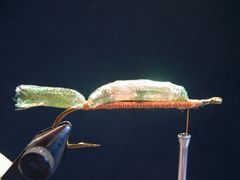 Step 4 Hold the body down on the shank, make one soft wrap of thread around the tubing only, and them make a wrap around the tubing and the hook's shank. Let the thread hang. While holding the body tubing down with your free hand, grasp the excess tubing - the stuff in front of the tie-down point - with your right hand and stretch the body while you take several tight turns of thread with your free hand to bind it down. Make sure the the body remains centered on top of the hook's shank during this process. Clip off the excess tubing, finish tying down the butts, and tie off the thread with a couple of half-hitches or a whip finish. 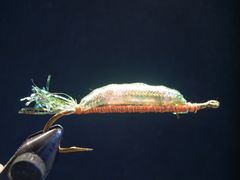 Step 5 Tease out the tail with your fingers and a bodkin.Seperate a dozen or so strands for the tail and clip the rest. Twist the strands to be removed; this makes a tight bunch that can be cut cleanly. 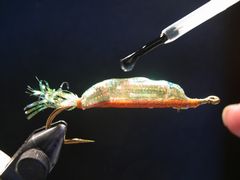 Step 6 Coat the body and the thread wraps with Epoxy, Loon Hard Head Fly Finish or even Sally Hansen's Hard As Nails nail polish. I hate to use Epoxy, so for most applications that call for it; I opt for Loon Hard Head Fly Finish. It's much easier to use as you can see in the photo and it works just as well. It dries quickly. You should give the body at least three coats of the finish. A hand held hair dryer speeds up the drying process. My East Texas buddy, Bill Heugel, uses clear nail polish to achieve the same objective. Another advantage to nail polish or Loon Hard Head is that each has a brush to apply the finish. 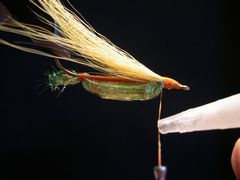 Step 7 For the wing building process you must invert the fly in the vice or if you have a rotary vice, rotate the vice one-hundred eighty degrees so that the belly is facing down. In the sequence to follow I'm using small bunches of yellow, orange, and brown deer hair interspersed with small bunches of gold Krystal Flash. You can use any color combinations for the wing that suits you. First, clip a small bunch of yellow bucktail and bind it down with about two-inches of your tying thread coated with Super Glue. Bucktail is slippery stuff and this will lock the hair to the hook. The bucktail hairs should be evened in a hair stacker and the bunch to be tied in should extend well beyond the hook's bend. 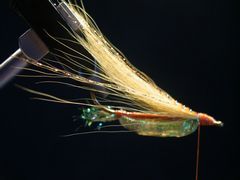 Step 8 Next, tie in about 6 to 8 strands of gold Krystal Flash that's the same length as the bucktail. 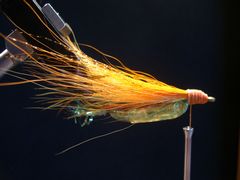 Step 9 Now clip, stack, and tie in a small buch of orange bucktail. Be sure to coat the thread with Super Glue before you tie in this bunch. 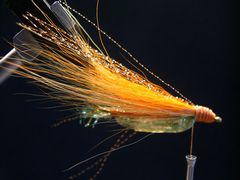 Step 10 Top the orange bucktail with a few strands of gold Krystal Flash. 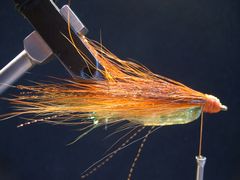 Step 11 Finally, prepare a small bunch of brown bucktail and tie it in the same way that you tied in the bunches of yellow and orange bucktail. 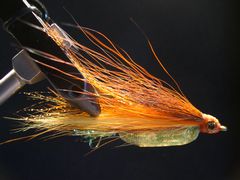 Step 12 Form a neat thread head that is large enough for the eyes and tie off the thread with a couple of half-hitches or a whip finish. Attach the eyes with a little dab of Household Goop. Then, give the head and eyes a couple coats of Loon Hard Head or fingernail polish and your Rattle Rouser is finished.
Warmwater Fly Tyer - by Ward Bean
© Copyright 2026 Ward Bean, Council Bluffs, IA, All rights reserved. © Copyright 2026 Ward Bean, Council Bluffs, IA, All rights reserved.
|