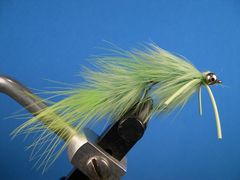
Swimming Flies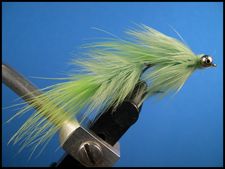 Ward's Articulated StreamerWhen the fish refuse to look up at my topwater offering I frequently go below and put the Articulated Streamer in their face. It works! Materials List
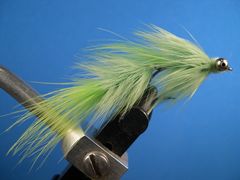
Tying NotesThe Articulated Streamer is jointed fly that has two parts joined together by a hinge which allows the back part (tail) to move independently of the front part (body). Aside from making the hinge, which can be slightly testy, the Articulated Streamer is a simple fly to tie. In addition, it has a number of other characteristics that make it a venerable warmwater offering. For starters, it's just the right size -- two and one-quarter inches -- to be attractive to a variety of warmwater gamfish incuding bass, large bluegills, and crappies. The bead chain eyes are just heavy enough to cause the fly to ride upside down thereby causing it to become somewhat snag proof. And, the fly is tied in the round so it doesn't matter what position it's in when it swims. The more moving parts a fly has the more lifelike it becomes and the eyes in combination with the optional rubber legs further enhance the streamers fish appeal.  The Articulated Streamer can be tied in a variety of colors and combinations of colors. My four favorite colors are chartreuse, black, white, and chartreuse with a black collar. Another key feature is the soft hackle that is used to make the tail and body of the fly. I recommend Whiting's "American Hackle" Hen Neck Feathers. The Hen Capes come in a variety of natural and dyed colors. If you're local fly shop doesn't have Whiting Hen Capes or won't order them for you, contact Whiting Farms for another source. Angling TipsIf you want the fly to sink faster and swim nearer the bottom you can substitute lead barbell eyes for the bead chain eyes used in the tutorial. You can use any of the strip-pause retrieves with this little guy but I most often use a fairly slow "figure-eight" strip-strip-strip retrieve. Tying Instructions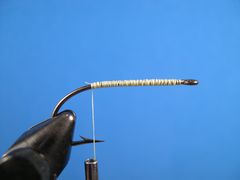 Step 1 Clamp the "tail" hook in the vice, attach the thread at the hook's eye, and lay down a base of thread back to the hook bend.  Step 2 Select a chartreuse blood marabou and stroke back the fronds to expose the tip and the stem. Remove about an inch or so of the tip. 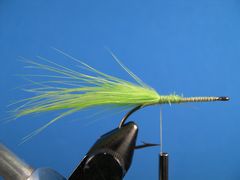 Step 3 Measure so that the marabou tail is one and one-half times the length of the hook. Tie the tail in at the bend.  Step 4 To begin to build the fly's tail, select a smaller feather from the bottom of the cape. Stroke the barbs back and measure their length against the hook. You want the barbs to extend past the hook bend by about 3/8th inch or so. Cut the feather's tip as shown in preparation to tie in the feather. 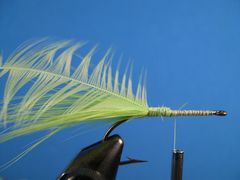 Step 5 Tie the feather in by the tip as shown with the cupped side of the feather facing the hook. 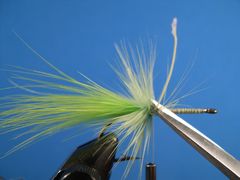 Step 6 Wrap the feather forward, tie it down with a couple of thread wraps, and remove the excess stem.  Step 7 Select a second feather and prepare it just as you did the first. Tie it in and wrap it forward, then bind it down with a couple wraps of thread. Remove the excess stem. 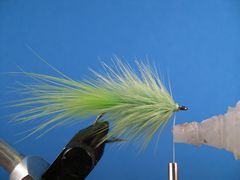 Step 8 Continue adding and wrapping hen neck feathers until the shank is filled. This tail took four feathers. Form a neat thread head and tie off with a Zap-A-Gap Knot by applying the glue to about an inch of thread nearest the hook and wrapping the wet thread over the existing tread wraps. 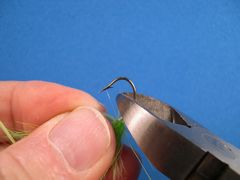 Step 9 Take the tail out of the vice and remove the rear part of the hook with a pair of side cutters as shown. Cut as close to the material and the thread wraps as possible without damaging them. Lay the tail aside for use later. 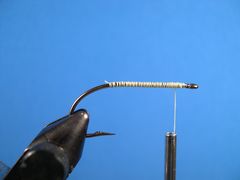 Step 10 To begin building the front section (body) of the fly, insert the hook in the vice, crimp the barb, and lay down a thread base from the hook's eye to the hook's bend. 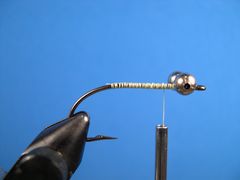 Step 11 Tie in the bead chain eyes about a hook's eye width behind the hook's eye. 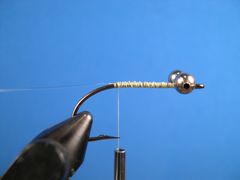 Step 12 Cut a three inch piece of 8# Mason Hard Mono for the hinge. Align it along the far side of the hook shank and tie it in as shown.  Step 13 Insert the free end of the mono through the eye of the tail and align the mono along the near side of the shank. Adjust the hinge as shown and tie in the mono. Remove the excess mono. 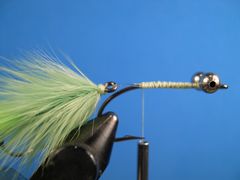 Step 14 This is the correct positon of the hinge in relation to the hook bend. 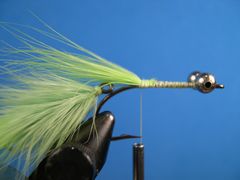 Step 15 Strip some fibers from a marabou feather and tie them in as shown as a skirt to cover the hinge connection between the tail and the body. 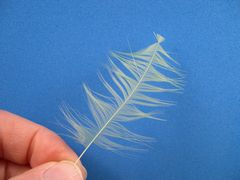 Step 16 To build the body you want to use hen neck feathers that are considerably larger than the feathers used on the tail. Select them from the upper part of the cape so that their barbs will extend well past the hinge between the tail and body. The tips of the first feather should extend about one-half inch beyond the front of the tail and the connection. 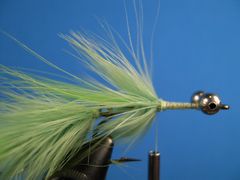 Step 17 Tie in the feather just like you did in Step 5. Bind the stem down with a couple turns of thread and remove the excess stem.  Step 18 Continue adding and wrapping feathers up the shank until you reach point about 1/8th inch from the bead chain eyes. Tie in the last feather as shown but before you wrap it forward to the eyes you have to decide whether you want to incorporate a set of rubber legs. If you decide to forego the legs, wrap the feather forward, add an additional feather if necessary, bind down the stem with a couple of thread wraps, remove the excess stem, and move on to step 21.  Step 19 If you decide to incorporate rubber legs, separate a five inch strand of rubber and tie the first strand in on the far side of the hook. Then, tie in the second strand on the near side of the hook. Next, move the thread directly behind the bead chain eyes. 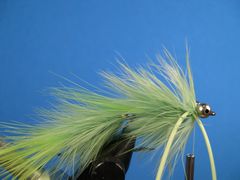 Step 20 Once the legs are in place, wrap the feather behind them, then through them, and finally in front of them. Continue wrapping until the feather is tight against the eyes. Tie down the feather with a couple wraps of thread and remove the excess stem. 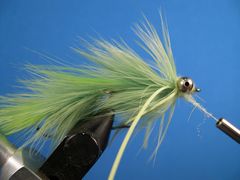 Step 21 To finish off the fly, dub the thread with Hare-Tron Dubbin and figure-eight the dubbing around the eyes until you develop a prominent head. Once you have a well defined head with the dubbing showing above, below, and around the eyes, form a thread head in front of the eyes. Tie off and remove the thread.  Step 22 Trim the legs as shown. About the length of the body. Step 23 Your Articulated Streamer is finished. Here is how it should look with and without legs.
Warmwater Fly Tyer - by Ward Bean
© Copyright 2026 Ward Bean, Council Bluffs, IA, All rights reserved. © Copyright 2026 Ward Bean, Council Bluffs, IA, All rights reserved.
|