Bottom Flies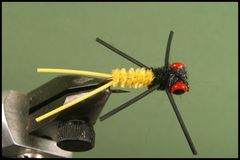 Carter's Weighted Rubber LegsThis is the first in a series of six weighted flies developed by Carter Nelson to take big panfish in deeper water during the heat of summer. Carter is the former Fisheries Director for Georgia's Callaway Gardens, known for it's giant Bluegills and lunker bass. Materials List
Tying NotesThe Weighted Rubber Legs is easy to tie. If you know how to attach rubber legs and tails and wrap chenille, you're in business. Remember to use very small dumbell eyes. Maximum weight should be 1/50th oz. If you can find the next smaller sizes (1/60th or 1/80th oz) - use them. I'm using black Haretron Dubbin for the head on the fly in the tying sequence but you can use any dubbing at hand, as long as it's black. Angling TipsYou can fish this little guy in fairly deep water because of the weighted lead eyes. With a seven and one-half foot leader on a weight-forward line you should be able to cover water five to seven feet deep. That's were the big gill's are when the water warms up. Sometimes I like to swim the fly and other times I prefer to crawl or bounce it on the bottom. All three retrieves work. The hook rides "point up" because of the lead eyes and also because of the way the shank is bent, so you don't have to worry much about snagging.  Tying Instructions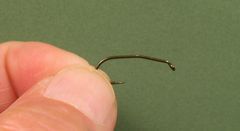 Sstep 1 Bend the hook to this shape with your pliers before you clamp it in the vice. It helps the fly to ride "hook point" up.  Step 2 Clamp the hook in the vice and crimp the barb. Start the thread behind the hook's eye and lay down a base of thread back to the hook's bend. 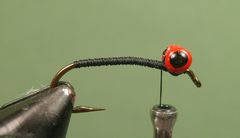 Step 3 Attach the Barbell eyes slightly behind the hook's eye with several figure-eight wraps of thread. A drop of glue on the thread wraps will help lock the eyes in place.  Step 4 Turn the hook upside down and tie in the tail. Fold a three inch piece of tail material and tie it in, starting at the eyes and wrapping back to the hook's bend. I do this because I want the legs to point up as the hook rides upside down in the water. If that does't matter to you, don't do it. Simply tie them in on top of the hook's shank. 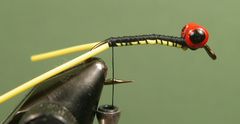 Step 5 Turn the fly right side up and trim the tail material so that the forked tail is slightly longer the length of the hook. 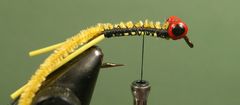 Step 6 Tie in a piece of yellow chenille at the base of the tail. Move the tying thread to about the two-thirds point on the hook's shank. 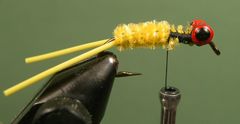 Step 7 Wrap the yellow chenille forward and tie it off at the standing thread. Remove any excess material. 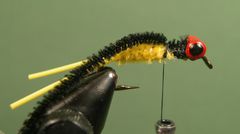 Step 8 Tie in a piece of black chenille at the base of the yellow chenille.  Step 9 Move the thread half-way between the chenille and the eyes. Tie in one pair of rubber legs (Madame X Style) on the far side of the hook's shank and another pair of legs on the near side. 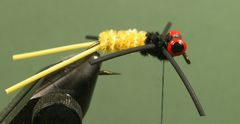 Step 10 Move the tying thread to the base of the eyes and wrap the black chenille forward. Take one or two wraps of chenille behind the legs, one wrap between the legs, and as many wraps as necessary between the front legs and the barbell eyes. You can give the front legs a swept back look by taking wraps of chenille on top of existing wraps or by wrapping the chenille as close to the legs as possible. 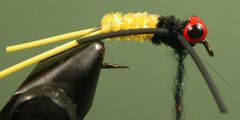 Step 11 Apply a thin noodle of dubbing to the tying thread in preparation for forming the head. 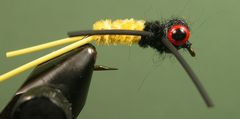 Step 12 Make several figure-eight wraps of the dubbed thread around the barbell eyes to form the head. Once you are satisfied with the head, tie off the thread and coat the thread head with head cement. 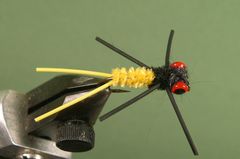 Step 13 Your "Carter's Weighted Rubber Legs" is finished.
Warmwater Fly Tyer - by Ward Bean
© Copyright 2026 Ward Bean, Council Bluffs, IA, All rights reserved. © Copyright 2026 Ward Bean, Council Bluffs, IA, All rights reserved.
|